
Learn Blue Sky Plan in 15 Minutes
Watch Impression Scan Inversion Process Flow Video
Wizard Process Flow
Impression Scan Inversion Process Flow
Follow along in Blue Sky Plan on Your Own Computer
Let's Go


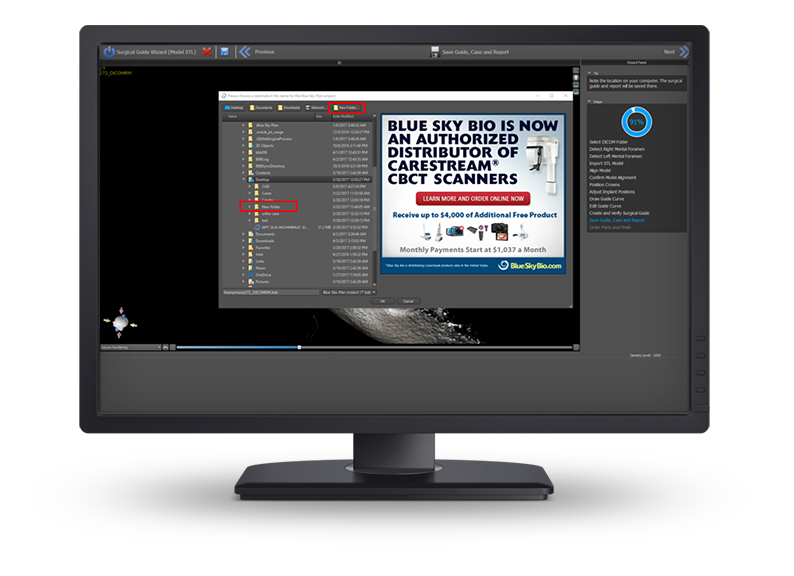
The wizard will be saving the currently open treatment plan, the designed surgical guide and a drilling report to your computer. Select a folder on your computer to save the treatment plan, drill report and Surgical guide or create a new folder by pressing the “New Folder” button and naming the folder.
Select the relevant folder and Press the okay button.

If you are going to be sending the digital treatment plan or the digital surgical guide for surgical guide fabrication, complete the approval form and then press
“Apply and Save”.
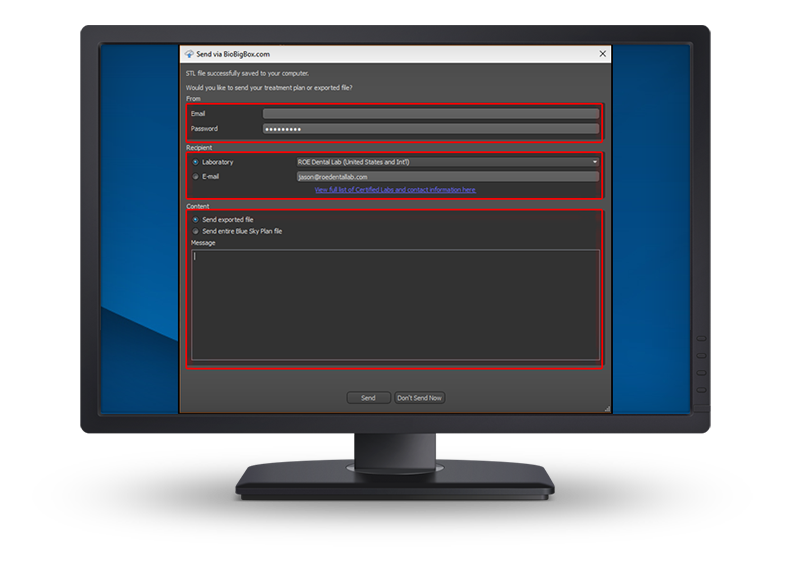
Use Biobigbox.com, Blue Sky Bio’s hippa compliant file transfer system, directly from within blue sky plan, to send the treatment plan or the surgical guide to a dental lab or any recipient.
If you do not yet have a bio big box account, create one free at biobigbox.com by entering your email and creating a password from biobigbox.com
Enter the email address and password from biobigbox into the relevant fields . Select “Laboratory” and one of the labs in the prepopulated list to send the case to one of the certified labs.
Or select “Email” and enter any email address to send the case to anyone with email address even if they do not have a bio big box account.
Select the option to either send the exported Surgical Guide file or the option to send the entire Blue Sky Plan Treatment plan file. Include any relevant information in the “message” box and then press the “Send” button.
Press the “Next” button.

The Blue Sky Bio website will open with the relevant metal cylinder and other relevant Blue Sky Bio parts added to the shopping cart. If you already own the relevant part, or would like to remove a part from the shopping cart. Press the red X to remove any parts from the shopping cart. Login or register if needed and complete the checkout process.

Draw the entire curve and close the loop by returning to the original start position and then press the “Next” button.

Hold the left mouse button to Grab and drag any of the nodes that appear along the surgical guide curve to fine tune the curve positioning and to straighten any crossed segments.
Press the “Next” button.

Review the fabricated surgical guide. Hold the left mouse button and move the mouse to grab and rotate the surgical guide and model.
Press the “Next” button.

In order to save the file of the surgical guide to your computer for 3D printing you are required to buy export credits. If you do not have export credits the software will prompt you automatically and payment can be made via PayPal or credit card directly in the software and the software will update automatically. Case fees are between $12.50 and $23 per case depending on quantity of exports ordered. After purchasing export credits the software will update immediately and automatically.

Left click in any view to place the implant and virtual tooth in the desired location. The 3D view can be rotated by holding the left mouse button and moving the mouse.

Hold the left mouse button to grab and move the implant and virtual tooth to the ideal location. This can be done in any view.
Moving the mouse over the implant will cause a rotation widget to appear. Hold the left mouse button to grab the widget and rotate the implant and virtual tooth.
The dots that appear next to the virtual tooth can be used to resize the tooth.
Once the implant and virtual tooth are in the desired location press the next button.

Now, in any view, use the left mouse button to move and rotate just the implant placement without affecting the placement of the tooth. The keyboard arrows can also be used to nudge the implant placement in small increments.
Once the implant is in the desired location press the next button.

The hole in the brown software guide tube represents the exact location and size of the hole that will exist in the printed surgical guide.
It is important to confirm the hole placement and that the hole in the inside of the brown software guide tube does not touch the model or an adjacent tooth.
If the placement of the hole or implant needs to be updated press the “Previous” make the relevant updates and then once again press “Next”.
Hold down the shift key and the left mouse button to define the area for surgical guide fabrication.
Release the shift key and hold the left mouse button to rotate the model as needed and press the shift key again and left drag to resume drawing the curve.
This is a basic training video on how to treatment plan and create a surgical guide using the teaching case associated with this video.
This is the recommended procedure for your own cases and is especially ideal for extensively restored dentitions.
Radiopaque scan markers, available via the Blue Sky Bio website, should be attached to the outside of an impression tray.
3
2


Radapiaque markers can be purchased directly from the Blue Sky Bio website by clicking on “Software” Selecting “components” And then choosing “cone beam markers”
Add bit registration material and place in the mouth to index teeth and to ensure no areas of the tray show through the impression material.
Sultan Healtchare, Rapid Set Regular Body is the recommended PVS material.
Fill the impression tray with PVS material insuring that the material fully covers and surrounds their teeth.
Take an impression. The teeth should not touch the impression tray.
4
5
6
7
8


9
10
11
Remove areas of excess impression material around the radiographic markers so the radiographic markers are clear and distinct from the impression material.
Snip the interproximal areas with scissors and remove to help with reinsertion.
CT scan the patient with the impression tray in their mouth. Use cotton rolls between the impression tray and the opposing arch to ensure full seating during CBCT scan.
12
13
14
15


Remove the impression tray from
the patient’s mouth.
A CBCT scan of the impression is taken with impression settings.
Blue Sky Plan is an advanced full featured treatment planning software for computer guided surgery and can be downloaded from BlueSkyPlan.com.
Blue Sky Plan allows all users to design and fabricate surgical templates for all guided surgical kits and all implant systems.
The software and software updates are distributed free of charge. Exporting a designed surgical guide to an STL file for 3d printing starts at $12.50 per case.
To take advantage of the powerful treatment planning software the minimum recommended requirements are 16GB of RAM on the computer, 2GB of RAM on the Video card and an intel i7 processor or comparable.
After downloading and installing the software complete the registration form and press “submit form”
Within a few seconds of pressing the submit button a notification will appear confirming that the software has been registered successfully.
16
17
18
19
20
21
22
23
24
25
26
27
28
29
30
31
32

From the drop down lists, select the option to import an “Impression CT with Markers” and the “Blue Sky Bio Fully Guided Surgical Kit”.
Press the “OK” button.

Open the blue sky plan treatment planning software and press the start wizard button.


Press the “Desktop” button in the top horizontal tooblar to navigate to your computer’s desktop and select the file “Patient CBCT with Markers”.
The software can load compressed DICOM files, uncompressed DICOM files as well as zipped CT scans.
Press the “OK” button.

Use the left mouse button to grab and drag the yellow border lines to reduce the field of view and define the area of interest.
Reducing the field of view better utilizes your computer’s resources and enlarges the relevant anatomy in the software views.
Press the “OK” button.


For a Maxilla case, press the “maxilla” button on the top the screen. For Mandible case Use the slider under the 3D to raise the density threshhold and remove scatter if needed.
Left click once on the entrance of the right mental foramen to have the nerve drawn automatically.
Press the “NEXT” button.
Left click once on the entrance of the left metal nerve to have the left nerve drawn automatically.
If it is necessary to redo a step, click the step name found at the top middle of the screen.
The nerve can also be detected by using the slider next to the top left view to move through the slices and locate the slice that shows the entrance to the nerve. Left click the entrance to the nerve for the nerve to be detected automatically
Press the “NEXT” button.
Press the “Desktop” button in the top horizontal toolbar to navigate to the desktop of your computer and choose the file “Impression CBCT with Markers.zip”.
Press the “OK” button.
Left click to grab and drag the yellow border lines to reduce the field of view and define only the area of the scanned impression.
Press the “OK” button
This screen allows for aligning of the markers in the impression scan to the markers in the patient scan.
The top left quadrant shows the patient scan.
Hold the left mouse button and move the mouse to rotate the CT scan.
Move the slider under the image to the right to raise the density threshhold and to show the markers more clearly.
Hold the right mouse button and the move the mouse forward to enlarge the image.
Left click on the marker icon. Then, while holding down the shift key, left click on each of the scan markers, placing a green dot on each scan marker.
In the top right quadrant, the impression scan view, left click to grab and drag the slider to the left to see the markers more clearly.
Hold the left mouse button and move the mouse to orient the markers in the same general positioning as the markers in the patient scan.
Left click on the marker icon. Hold the shift key and left click on each of the scan markers, placing a green dot on each scan marker.
Left click the “Align Points Only” box and then left click the “update” button to align the two sets of markers in the bottom right view.
Finally hold down the left mouse button and move the mouse to rotate the impression scan in the bottom left view to see if there are any holes in the impression.
Hold down the right mouse button and move the mouse forward to zoom in.
If there are holes this is an indication that the impression scan tray was not prepared properly according to the steps outlines in the beginning of this video.
If there are tiny holes, lower the slider underneath the impression scan in very small increments until the holes have been filled.
Then press the “OK” Button


Hold the left mouse button to grab and rotate the impression scan.
Hold the right mouse button and move the mouse forward to zoom in.

Hold the shift key and the left mouse button to draw the curve a define the area that should be inverted into a model.
Continue the curve until the entire relevant area is indicated and return to the start point to close the curve.

Click the “edit curve” button. Fine tune the placement of the curve by grabbing and dragging any of the nodes to remove any crossed lines.
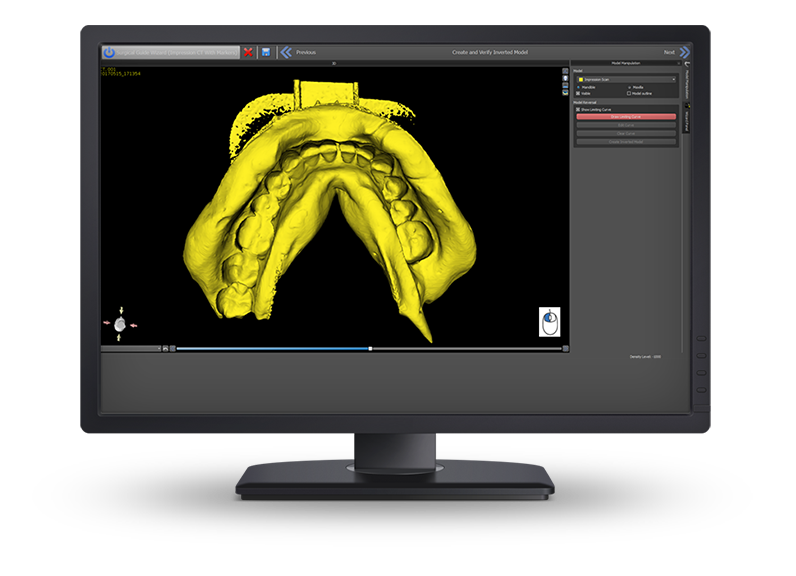
Press the “Create Inverted Model” button.
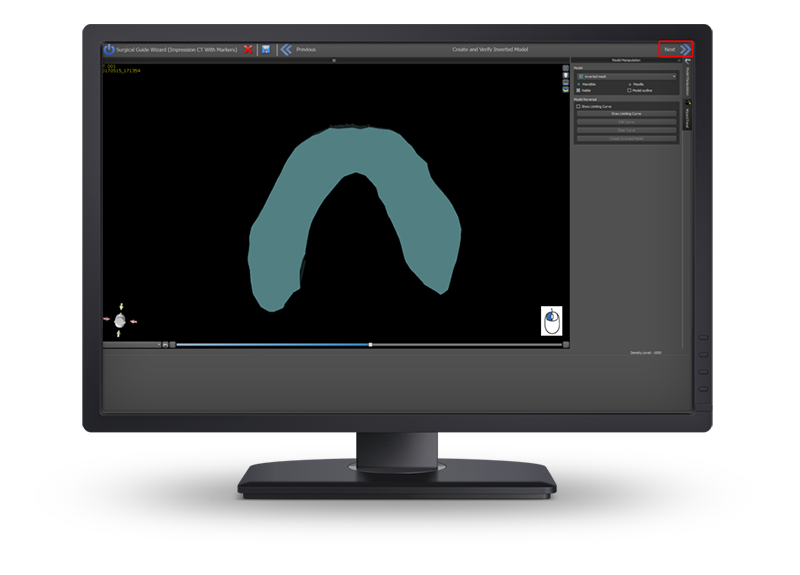
Hold the left mouse button and move the mouse, to grab and rotate the digitally poured mode to confirm proper model creation.
And then press the next button.

Left click to select the correct virtual tooth in the location of the missing tooth.
Select small, medium or large to represent the size of the desired virtual tooth.
Press “select implant” to select the desired implant to be placed together with the virtual tooth.

Select “Mandible” as the Implant Orientation. Select “Blue Sky Bio” from the “Implant System” drop down. Select the BIO | Max implant type, 4.3mm implant platform, and select the 10mm implant.
Press the “OK” button.
Press the “OK” button to confirm the virtual tooth and implant selection.
33
34
35
36
37
38
39

Return to the Blue Sky Plan software and Choose from the on screen options to start a new case or to close the wizard.
51


